Astrophotography at Ijen: Milky Way Timing & Settings

Standing on the rim of a volcano at 3 AM is a surreal experience. The wind howls across the caldera, carrying the sharp scent of sulfur. Above you, the sky explodes with millions of stars, far from any city lights.
Most travelers come here just for the sunrise or the blue flames. Photographers, however, know that the real magic happens in total darkness. Planning your shoot requires more than just a camera and a tripod.
Success at Ijen depends on precise timing, local knowledge, and the right technical approach. You are fighting freezing temperatures and corrosive gases to get that one perfect frame. This guide helps you book your trip now and master the elements.
Why This Shoot Is Different
Ijen is not your typical dark-sky location. The volcanic activity creates a unique atmosphere that can either enhance or ruin your shots. Before you start, check our ijen crater tour guide for the basics.
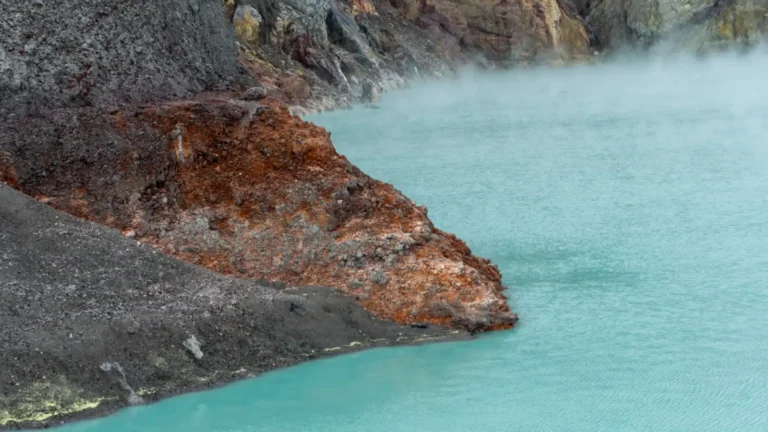
This mountain demands respect and preparation. If you aren’t ready for the physical toll, your photography will suffer. Let’s dive into the specifics of capturing the galactic core over the world’s largest acid lake.
What You Need to Know
Timing: The Milky Way core is visible from March to October. Peak season is June through August for the clearest skies.
Location: East Java, Indonesia. The trailhead starts at Paltuding basecamp, followed by a steep 3km hike.
Gear Essentials: Full-frame camera, f/2.8 or faster lens, sturdy tripod, and a professional gas mask.
Condition: Volcanic gas can obscure the sky instantly. Always have a backup plan for sunrise shots.
Why Trust This Guide
We aren’t just travel writers; we are on this volcano every single week. Our team works directly with local rangers and sulfur miners who know every shift in the wind. We’ve seen hundreds of photographers struggle with gear failure and missed opportunities.
This guide comes from real-world trial and error on the crater rim. We know which tripod legs stand up to the volcanic ash and which lenses fail in the cold. Our data is updated daily based on current volcanic activity and weather patterns.
Local Expertise Matters
Conditions at Ijen can change in minutes. A clear sky can be swallowed by a sudden plume of thick, white smoke. We track these patterns to give you the best possible window for your shot.
Experience has taught us that the “perfect” settings on Google often fail in this unique environment. You need advice from people who have breathed this air and climbed these trails in the dark. We are those people.
Timing the Galactic Core: When to Visit
The Milky Way isn’t always visible in its full glory. To see the bright galactic center, you must align your visit with the “Milky Way Season.” In Indonesia, this typically spans from late February to early October.
Earlier in the season, the core rises just before dawn. By July and August, it dominates the sky for most of the night. This period coincides with the dry season, providing the clear skies you desperately need.
The Lunar Cycle Strategy
Moonlight is the enemy of deep-sky astrophotography. A full moon will wash out the subtle details of the Milky Way. You must plan your trip around the New Moon phase for the darkest possible backdrop.
Check a lunar calendar before booking your flights. Aim for a window that starts five days before the New Moon and ends five days after. This ensures the moon is either below the horizon or a very slim crescent.
Seasonal Weather Hazards
The dry season isn’t a guarantee of clear skies. High-altitude clouds can roll in from the Indian Ocean without warning. However, the months of July, August, and September offer the highest statistical chance of success.
During the rainy season, from November to January, the trail is often slippery and dangerous. Clouds usually sit heavy on the summit, making astrophotography nearly impossible. Avoid these months if the Milky Way is your primary goal.

Camera Settings for Volcanic Night Skies
Darkness at Ijen is profound. Your camera sensor needs to drink in as much light as possible without introducing too much noise. This requires a delicate balance of ISO, aperture, and shutter speed.
Start with your widest possible aperture, ideally f/2.8 or f/1.8. This allows the maximum amount of light to hit the sensor. If you use a slower lens, like an f/4, you will need to push your ISO much higher.
| Setting | Recommended Value | Why? |
|---|---|---|
| ISO | 3200 – 6400 | Balances light sensitivity with digital noise. |
| Aperture | f/2.8 or wider | Crucial for capturing faint starlight. |
| Shutter Speed | 15 – 25 seconds | Prevents star trailing based on focal length. |
| White Balance | 3500K – 4500K | Keeps the sky looking naturally blue/cool. |
The Rule of 500
To keep the stars as sharp points rather than blurry streaks, use the Rule of 500. Divide 500 by your focal length to find your maximum exposure time. For example, a 20mm lens allows for a 25-second exposure.
Modern high-resolution sensors often require a stricter Rule of 400. If you see slight trailing, shorten your shutter speed by a few seconds. Sharp stars are always better than slightly brighter, blurry ones.
Focusing in Total Darkness
Autofocus will fail you on the crater rim. You must switch to manual focus and use the “Live View” screen. Find the brightest star in the sky and zoom in digitally on your screen.
Carefully turn the focus ring until the star is a tiny, sharp pinprick of light. Once set, use a piece of gaffer tape to lock the focus ring. This prevents accidental shifts as you move your tripod in the dark.
To truly capture the essence of East Java’s volcanic landscapes, consider ijen crater tour options that allow for flexible timing. Many photographers prefer the bromo ijen tour to compare the different light qualities of two iconic volcanoes. If you are starting your journey from other regions, the east java tour provides a comprehensive look at the area’s natural wonders. For those focusing solely on the stars, a mount bromo tour offers equally stunning astrophotography opportunities alongside Ijen.
Protecting Gear from Corrosive Sulfur
The most dangerous part of Ijen isn’t the steep climb. It is the highly corrosive sulfur gas that eats away at electronic components. These gases can permanently damage the coatings on your expensive lenses.
Never change your lenses while standing on the crater rim or inside the caldera. The fine volcanic dust and gas can enter the camera body and settle on the sensor. This results in permanent damage or a very expensive repair bill.
Sealing Your Equipment
Use a high-quality UV filter as a sacrificial layer for your glass. It is much cheaper to replace a filter than a front lens element. After the shoot, wipe your gear down with a damp cloth to remove any acidic residue.
Keep your camera in a sealed bag when you are not actively shooting. Many professionals use rain covers even when it isn’t raining. This provides an extra barrier against the swirling volcanic ash and gas clouds.
The Tripod Struggle
The ground at the summit is often loose volcanic sand or sharp rocks. A lightweight travel tripod might struggle in the high winds common at these altitudes. Consider hanging your backpack from the center column for extra stability.
Salt and sulfur will also attack the locking mechanisms of your tripod. After returning to your hotel, rinse the tripod legs with fresh water. If you don’t, the joints may seize up within a matter of days.
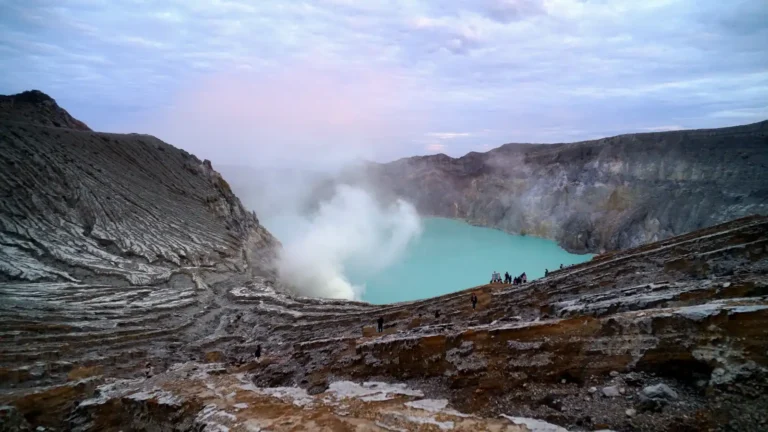
Composition Secrets: Rim vs. Crater Floor
Where you stand determines the narrative of your photo. The crater rim offers a panoramic view of the entire caldera and the distant peaks. From here, you can capture the scale of the landscape against the cosmos.
The “Dead Forest” on the slopes provides incredible foreground interest. These skeletal trees, killed by volcanic activity, create a haunting silhouette against the Milky Way. They add a sense of drama and mortality to the shot.

Descending for the Blue Fire
If the gas levels allow, descending into the crater provides a perspective few ever see. Capturing the blue fire together with the Milky Way is the “holy grail” of Ijen photography. This requires extreme skill and luck.
You will need to balance the bright light of the burning sulfur with the dim light of the stars. This often requires “bracketing” or taking multiple exposures and blending them later. It is a technical challenge that tests even seasoned pros.
Light Painting the Landscape
The crater can look like a black void in photos if you aren’t careful. Use a low-power headlamp to briefly “paint” the foreground or the crater walls. Just a few seconds of light can reveal the texture of the rocks.
Be respectful of other photographers nearby. Always announce when you are going to use a light. Nothing ruins a 25-second exposure faster than a stray beam from a neighbor’s headlamp.
Local Realities and Logistics
You need to understand the physical toll this journey takes. The hike starts at midnight to reach the summit in time for the Milky Way. It is a 600-meter vertical gain over a relatively short distance.
The temperature at the summit can drop near freezing. While you are sweating on the hike up, you will freeze once you stand still for photos. Dress in layers and wear a windproof outer shell to stay warm.
Crowds and Reality
Ijen is no longer a “hidden” spot. By 3 AM, the rim can be crowded with hundreds of hikers. Finding a quiet spot for a tripod can be frustrating and competitive.
Arriving even earlier can help you claim a prime location. Local guides know the less-frequented paths that offer better views away from the main tourist flow. Listen to their advice to avoid the “light pollution” from hundreds of tourists’ flashlights.
Health and Safety Warnings
The volcanic gases are no joke. Even if you are just on the rim, the wind can shift and envelop you in suffocating sulfur smoke. Always wear a professional gas mask with proper filters.
If you feel lightheaded or start coughing uncontrollably, move away from the gas immediately. No photo is worth permanent lung damage. Your guide will monitor the wind and tell you when it is time to retreat.

Continue Your Adventure
After conquering the stars at Ijen, East Java still has more to offer. You could be combining this trip with a Mount Bromo sunrise tour for a completely different volcanic landscape. If you prefer a longer exploration, the East Java multi-day journey covers waterfalls and ancient temples. For those looking for the ultimate convenience, book your trip now and let us handle the complex logistics of mountain transport. We also highly recommend checking the best time to visit Ijen Crater to ensure your schedule aligns with the weather patterns. For more inspiration on framing your shots, our guide to Ijen Crater photography offers deeper creative insights. For those specifically chasing the flames, read about whether you can still see blue fire this season.
Ready for the Night of a Lifetime?
The stars at Ijen are waiting, but they won’t wait for you to be unprepared. Secure your spot with a team that understands the needs of professional and amateur photographers alike. Let’s capture the cosmos together.
Frequently Asked Questions (FAQ)
Q: Which viewpoint is the least crowded for astrophotography?
A: Most tourists stay near the main sunrise point. If you walk about 15-20 minutes further along the rim toward the “Dead Forest” or the opposite side of the caldera, the crowds thin out significantly, providing a clearer space for your tripod.
Q: How bad is the dust for my camera sensor?
A: It is quite severe. The volcanic ash is fine and abrasive. Avoid changing lenses entirely once you start the hike. If you must change them, do it inside a sealed “changing bag” or a very well-shielded backpack.
Q: Can I use a smartphone for Milky Way photos at Ijen?
A: Modern flagship phones with “Night Mode” can capture the Milky Way, but the results won’t match a DSLR or Mirrorless camera. You will still need a tripod mount for your phone to keep it perfectly still for the 10-30 second exposure.
Q: How do I keep my lens from fogging up in the cold?
A: The humidity inside the crater mixed with the cold air often causes condensation. Use a battery-powered lens heater or chemical hand warmers wrapped around the lens barrel with a rubber band to keep the glass slightly above the dew point.
Q: Is there light pollution from the nearby cities?
A: Ijen is relatively dark, but you will see a light glow on the horizon from Banyuwangi and Bali. According to DarkSky standards, it ranks as a Bortle 3 or 4 location. The core remains very bright despite the distant glow.